Saturday, October 20, 2012

Witch Candy Bar Card

Hi ya friends,
I have the next character ready to unveil to tempt your sweet tooth. It's a candy bar card just like Frankie, his hunny, and Mummy, but this one has a couple of ghastly additions!
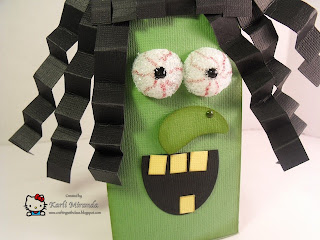
Here it is:
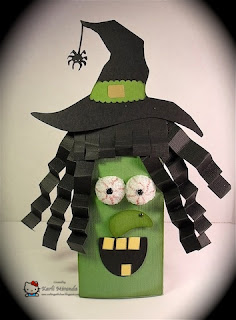
So joining the cast is this frightful & delightful little witch. But don't let her scare ya---> it's what's on the inside that counts & that's a Hershey bar!

So here's today's tute!

Tools you'll need:
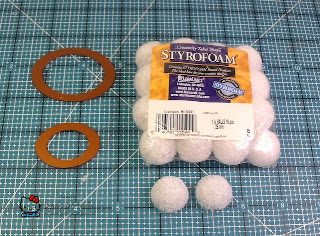
The 2nd & 3rd largest ovals from the SMALL Oval Nestabilities
1 one inch Styrofoam ball

Here are the parts:
I cut out a witch hat from the Happy Hauntings Cricut cartridge. (Download the template for two hat options ---> Here <---)

The items on the left are the "befores" and on the right you have the "afters"---> what the pieces will look like once they've been altered.
1 black oval (from the 3rd largest die). Cut about 1/4 of it off to create the open mouth.
1 green oval (from the 2nd largest die). I trimmed it to create her hooked nose. Then I added a green spot of green Pearl pen to create a wart.
Cut the styrofoam ball in half to create the eyes. I took a BLACK Sharpie & made dots to the centers of the balls (pupils) then I took a RED Sharpie & made some squiggle lines so she looks like she needs some sleep! Then I added some dimensional pupils with my black pearl pen.

You'll also need some 1/2" strips of black cardstock for the hair. Accordian fold it to create the stringiness and a 1 3/4" x 2 3/4" piece for the bangs.

Now you're ready to assemble!
Glue the strands of hair to the card base. Then add the bang layer and the hat on top of that.

Glue the eyes...

The nose...
and the mouth. Be sure to add some teeth! I simply cut little yellow squares from a piece of yellow scrap paper, but if you want your witch to look even ghastlier...
You can give her some pointy, sharp teeth!

And your witch is done!
All the 3D elements make this girl loads of fun to give & receive :)


I'd like to throw my hat in the following challenges:
One Stop Crafts: Anything Goes
Card Crafter's Circle: #45 Halloween
Inspire Me Fridays: Anything Goes

Thanks for peeking today!
Hope you have a frightfully great day! cackle! cackle! cackle!

Wednesday, October 17, 2012

Yummy Mummy

Hi ya friends,
Sorry I'm late posting today's project & tute. I have to admit I've been very distracted by all the horror movies on tv right now (being so close to Halloween :) and of course, the return of The Walking Dead---> LUUUUV it! So glad the walkers are back! No worries, there are no spoiler alerts needed today (I learned from last season with spoiling Sofia being in the barn ;(
Today I have the next candy bar card making it's debut.
Here it is:
 Say Hola to Mr. Mummy, all wrapped up in gauze. He uses the same card base as Frankie but I decided to turn this one into a pull one.
See? Look at the innies:

Pull up on the ribbon, & the chocolate magically comes up---> no need to untie the mummy!
You might have noticed, I added a small velcro dot to keep the card closed.

Sooo, are you ready to unwrap the mysteries of our mummy guy???
Here's the tute!

Here's what you'll need:
white cardstock
gauze (cut into strips)
ink
 I wrapped a piece of white cardstock 2 1/2" x 5 3/4" with strips of gauze. (I inked those to age Mr. Mummy a bit.)

Add adhesive to the edges of the back of the cardstock. Start wrapping the strips around the paper, overlapping a bit, & securing the ends to the back edges. Keep wrapping in a random fashion.

 Here's mine completed.

Now add googly eyes by adding glue dots to the back & tucking them in between the bandages.
 (Sorry, Mummy doesn't have cataracts, it's the glare from the lights.) Now simply adhere this panel to your card front and...

Tah Daaaah! you have a mummy in minutes!

 If you don't have gauze, you can use white cardstock strips, fabric strips, tissue paper---> lots of options :)

To make the pull option, simply make a slit at the top of the pocket, thread your ribbon/gauze through & push your candy bar into the pocket (the ribbon will wrap itself around the candy bar as it goes down). Then simply tie the ends at the top.

There are more friends to come... stay tuned!
Thanks for peeking!

Sunday, October 14, 2012

Frankie Candy Bar Card

Hi ya friends,
Today I wanted to share some little gifts I have for some friends this Halloween. Two years ago, I created a Snowman Candy bar wrapper:
I thought I would resurrect this project just in time for Halloween, but add a little somethin' somethin' extra---> a card front. Brilliant! Genius!! um, more like----> LAZY!!! (hee hee hee). I didn't want to make separate cards so I married the two :) This way, they get a card & chocolate pocket in one :)

Here's my Frankie Candy Bar Card:
Here are the innies:
So the chocolate slides in the pocket where I will write my message.

These are so fun & easy peasy to create! Wanna see how?
Step into my lab...It's TUTE TIME!

Here's what you'll need (and if you don't have something, I'm sure you can easily substitute it).
Click on any pic to get a closer peek!
Tool Time:
1" circle punch, 5/8" circle punch, smallest oval from the SMALL Oval Nestabilities, arrow punch.

Recipe for monster parts:
1 green oval
1 green 1" circle (cut in half for 2 eyelids)
2 white 1" circles
2 black 5/8" circles
2 small arrows (Trim the 3 tips & the end to create the "bolts" for his neck, as shown with the arrow on the right)

If you only want to make the pocket WITHOUT the card front:
Start with a 6" x 6" piece of cardstock
SCORE at 1/2" and 3 1/4"
Add Scor-Tape or Sticky Strip to 1/2" edge. Fold edge & adhere to the other side to create wrapper. (You will have a seam on the inside of the wrapper.)

If you want to make a pocket WITH the card front, follow me:
 Start with a 6" x 8 3/4" piece of cardstock.
Score: 1/2",  3 1/4",  and 6".
Add scor-tape to 1/2" tab as shown.

 Turn you paper so that the tape is on the right.

 Fold the edge & remove the liner to expose the adhesive.

 Fold on the edge & adhere to the other side to create wrapper.

Fold the last score line forward to create the card front. That's it!

  Now you can stick your candy bar in the pocket to try it out. Then eat it to make sure it's fresh ;) It's OK, there's 6 in the pack :)

To create his monster features: EYES
 Adhere the black circles to the white ones. Add foam adhesive to the lids & nose. (I inked the front of those).
Then stick the lids on the eyeballs. Add the white highlight to his eyes with a white gel pen.

HAIR: cut a 2" x 2 3/4" piece of black cardstock. Cut random triangles from the edge.

MOUTH: Make a wavy "W" and add stitch marks and don't forget to add his SCAR!

But WAAAIIIT! Can you stand to see more???
Cuz Frankie isn't hitting the party stag. Oh no. Frankie has a hunny :)

Here they are:
Look at him... he's smitten with her. And who wouldn't be with those long come-hither lashes!

To make her, follow the same steps as Frankie but you'll need to make the following changes/additions:

HAIR: cut a 2 1/2" x 2 3/4" piece of black cardstock and a 3/4" x 2 1/2" piece of white cardstock. I ran mine through the Swirl CB embossing folder to give it her signature wavy look.

EYELASHES:
 Cut a 1/2" x 1"  piece of black cardstock. I used my MS fringe scissors (I knew I bought those for a reason :) to create the lash hair. I rolled it on a pencil to give it a natural curve.

Next I added a thin line of eyelash adhesive (ok, it's regular adhesive) to the top edge & adhered it UNDER the eyelid. Let it dry. Once dry you can shape it & trim any thing if you'd like.

I hand drew the mouth & added some green Stickles to give her eyes that bit o' sparkle!

Here are her innies:

And both together:


Now they're ready for a spooktacular party time! But wait... where are the guests??? Well, they're on their way... and this mad scientists will be sharing all the deets same bat time same bat channel....

Bwahahaha! Cackle! Cackle!

But in the meantime, I'll be joining in the fun in the following challenges:
Corrosive Challenge: Treacherous Treats
Crazy 4 Challenges: A Sweet Treat
Inspire Me Fridays: Anything Goes 80
Our Craft Lounge: Spooky & Sweet
Polka Doodles: Halloween

Thanks for peeking!


Tuesday, October 9, 2012

Got my eyes on ya!

Hello friends,
Hope you had a great weekend :)
I have another Halloween card for ya that eye had so much fun creating!
Here it is:
 I saw these eyeball stickers & knew I needed to put them in some kind of jar. As the sign says, they're fresh & only 5 cents! That's a steal!

Here's a closer peek at that:
They're epoxy stickers so it really makes those eyeballs look cool :) I used the PTI Friendship Jar Summer Filler stamp set for the jar. I should have totally stamped that on vellum cuz my shading is unnoticeable. (That's what happens when you don't color for 4 months, ughhhh :(  I used the MFT Halloween charms- spiderweb as accents to which I added Black Diamond Stickles for sparkle. For more fun, I made a huge eyeball to mirror the ones in the jar (for the round element) with circle punches.

I used this week's Sweet Stop Sketch:

I've got my eye on the following challenges:
Stampalot: punch away (oval & circle punches)
Crafty Calendar: All things Spooky

I have loads of school stuff to grade so I'll be seeing ya! (Last terrible pun, pinky promise!)
Thanks for peeking! (OK, that one doesn't count ;)

Sunday, October 7, 2012

Courage

Hi friends,
I have a card I made for a friend who recently lost his wife to cancer. It started out as breast cancer then it spread to other organs. One thing he said to me at her funeral that really touched my heart was that after the anger, and emotions cleared in his mind & heart, he decided that the way he was going to honor his wife was to be the man SHE knew he was inside. If you knew him, you'd understand how powerful that was, cuz he's one of those guys who is rough around the edges. He was going to be a better teacher, son, brother, and friend---> for her. He felt that because of cancer, life had lived them, and now he was going to live life to the fullest.

Here's my card:
 I don't know that I was attempting to go for masculine- actually, I know I wasn't. I had both of them in mind.
The papers I chose are from MME cowboy. I used the Picot edge Nesties for the larger element to which I added a sprinkling of pearls with my Viva pen. The beautiful sentiment comes Verve (one of my fav sets- Blue Skies.)
 Here's a closer peek at that:
and you might have noticed a little butterfly peeking out from the bottom. It was my way of acknowledging his metamorphosis as he emerges from the chrysalis that has been the past few years. It makes my heart glad to know he is at peace with his wife's passing. And he is courageous for waking up everyday & facing all the feelings he has head on. I know she's proud of him.

October is Breast Cancer Awareness month. So many of us have been affected by this horrible disease. Some of you may know, my mom was diagnosed with breast cancer when I was about 7 years old. Early detection made all the difference for her.

 I used this week's Mojo Monday sketch:

Thanks so much for peeking today. I leave you with one of my favorite quotes:
"You gain strength, courage and confidence by every experience in which you really stop to look fear in the face."  ~Eleanor Roosevelt 
Fight on!
Blog Widget by LinkWithin