Monday, October 7, 2013

Good Times, dear chalkboard

Hi friends,
I remember, when I was a little girl, playing school with my stuffed animals and Barbies (as many a little girl does) *Ü* One of my favorite things to do (besides passing out stickers for a job well done) was writing on the chalkboard. Well, years later when I became a real teacher, I looked forward to writing on a real, legit chalkboard! I loved it!!! I was living the dream... Then my dream was erased away when whiteboards started replacing them. I understood that some children's allergies were made worse by all the chalk dust, but white boards just weren't the same... I missed my chalkboard...  But chalk it up to this wonderful hobby, as now, I get to once more enjoy the chalkboard... at least the look of it through the oh so popular chalkboard technique.

Here's my card:
 I used a sentiment from MFT's Chalkboard Greetings stamp set. I embossed it in Hero Arts white embossing powder & tapped it with my frost white ink pad. The flower is my fave MFT flower die- mini hybrid heirloom rose. It absolutely makes the preeeettiest flowers *Ü* and if you get that, you've gotta get the Royal Leaves---> They go together perfectly! All the papers are Anna Griffin. The border, cut from gold cardstock, is from Cheery Lynn. Ahhh, sweet, sweet chalkboard... you're still the one...

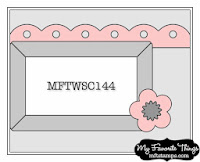
I used this week's MFT sketch (rotated):

Well, after all of this, I don't want you to think I'm a dinosaur resistant to change. I am so happy to be rid of the overhead projector. I luv, luv, luv my Elmo document reader that took it's place. Now, if someone can find a replacement for grading essays, I'm all ears!

I'm playing along in the following challenges:
613 Avenue Create: Anything Goes challenge #40
Creative Craft Challenges: Anything Goes
Tip Top Tuesday: Flowers  My tip: for heat embossing use an embossing buddy to prevent fly away powder. Hero Arts white embossing powder leaves a thick, smooth, solid imprint. I call it Jaws because it really is a great white. ;)

Thanks so much for stopping by today.
Until next time...

Sunday, October 6, 2013

Hope

 Hi friends,
 I spent part of Saturday (World Cardmaking Day) making a mess in Studio K! Being that it's Breast Cancer Awareness month & there are loads of card drives going on, I thought I should make as many as I could get done. As I've said in the past, this is a cause that's near & dear to my heart because my mom was diagnosed with breast cancer when I was 7 years old. She beat it thanks in part to early detection. My godmother who was also diagnosed, was not so fortunate. She passed away at 32 years old, leaving behind 3 young sons...

I settled on this design:
 Since I was making several, I needed something simple but pretty. I used PTI's Fanciful Flourishes & stamped it with the Ranger Sticky Embossing Powder. Then I added Prisma glitter because it's super sparkly. I like using the sticky powder because it really holds on to the glitter. I die cut the butterflies from vellum & added a pink ribbon on the body. Last, I stamped the sentiment from the Hope stamp set from Taylored Expressions.

Here's a closer peek at the sparkle:
Zombies aren't as scary as my photog skills! these cards came out so pretty (in my humble opinion :) and I hope they bring the recipients exactly that... HOPE.
 I used this week's Mojo Monday sketch:

Hope you had some crafty time this weekend! Now, to get ready for the week :(
Tootles!

Wednesday, October 2, 2013

Thinking of Grammy

Hi friends,
I haven't had a chance to visit my Grammy like I normally do because I've been so busy so I thought if I can't be there to give her a hug in person, then I should send a hug with a fold in the middle. So I made this card to let her know I'm thinking of her.
Here it is:
 Sorry I didn't get a good pic of it, but I already sent it off to her. I used the fill in the blank stamp set from Avery Elle. All the papers are Anna Griffin.

Here's a peek of the innies:
 I know she'll be surprised to open her mailbox & find my card. I always hand deliver my cards so she won't be expecting it *Ü*

I used this week's sketch at The Sweet Stop:
Thanks so much for peeking!
Tootles!

Monday, September 30, 2013

Kleenex Box Cover

Hi friends,
I have a crafty project for ya today. I've been wanting to make a cover for the Kleenex box in my classroom for a loooong time! I finally made one, quick & easy & with the help of my fave svgcuts.com.
Here it is:
 I thought this school subject paper (from Mike's) was perfect for the box cover.

Here's a peek of it from the top:

Can you see how the "Spanish" is popped up? *Ü*
 This was one of the awesome projects from the Back to the Books svg collection. It covers a standard size rectangular tissue box.

We always need tissues in the classroom. What a nice gift this would be to send along to your child's teacher along with a few refills *Ü* That will definitely get you closer to that A+!

That's it for now.
Tootles!

Sunday, September 29, 2013

PI Girls

Hi ya friends!
I have been crazy busy, but finally had a whole weekend to spend in Studio K!
Today, I have a couple of cards to share.
Here's the first:
 I haven't colored in forever, so I was really struggling to color this PI. I thought about putting her in the round file (trash can) several times, but just couldn't :( I knew I hadn't colored in a while & was really rusty, but this was ridiculously horrible! Then I realized what it could be... my E00 marker was dry!  Luckily, I had the refill & proceeded to refill my marker. Once it was ready to go, I tried to fix her a bit.  That did help some & kept her out of the round file.

Here are the innies:
 I took the other half of the circle to bring the balloon element to the inside. I used twine for string.

Now on to something a bit more spooky!
 What a difference a wet marker makes! Although I am still totally rusty, I felt much happier with her skin. I couldn't wait to ink her up! I added yellow Spica glitter pen to the jack-o-lantern face on her shirt. But she's not just for Halloween. Her little shirt is blank & you stamp the face on it. The little grave stone is from the Halloween charms Dienamics. The fence is a MS punch. The moon was made from yellow vellum. This card came together speedy quick!

I used this week's MFT sketch for both cards:

 Since it's been a while, I think I'll play along in the following challenges:
 Corrosive Challenges: Cute & Creepy
613 Avenue Create: Make your own challenge: At least 1-3 from every column  
Addicted to stamps: Create a Scene
A.R.T. Card Challenges: Anything Goes
Charisma Cardz: Decorate the inside of the card
Simon Says Stamp: Anything Goes

I'm so happy to have had a couple of lovely crafternoons *Ü* and that it's Pumpkin Spice Latte time at Starbucks!!! And... McDonald's has their version of PSL too & it's yummy as well.

Life is Good, friends *Ü*
Until next time...
Thanks for popping by!

The 411
Card #1
Stamps: PI -digital, Pretty Poppies-MFT
Ink: Night of Navy-SU
Paper: On the bright side-MME, Harvest Gold, Rustic White-PTI
Tools: Accent it: Celebrate-MFT dienamics
Other: copics, viva pen, twine, white gel pen

Card #2
Stamps: PI- Pretty Pumpkin-MFT
Ink: Memento tuxedo black, silver-Hero Arts
Paper: Black-PTI, Night of Navy -SU, Steel Gray- MFT, Vellum, Happy Haunting- Graphic 45
Tools: Halloween Charms- MFT, Iron Fence punch- MS
Other: copics, Viva pen

Saturday, September 7, 2013

back (pack) to school

Hi friends,
I have a new version of that infamous back pack to share today.
Here it is:
 From the side:

 open:
 It's so super quick & easy to whip together! It's another file from the Back to the Books collection from svgcuts.com.

Here's how it compares to the one I designed on my GYPSY.

 The svg back pack can be made with 8 1/2" x 11" cardstock. It's not as tall as mine but it's almost as wide so it can hold quite a bit of treats for the teacher. Did I mention how easy-peasy it was to assemble? Yup, it's one you can easily create multiples of.

That's it for today!
Thanks so much for popping in *Ü*
Tootles!

Wednesday, September 4, 2013

Let's Converse

Hi friends,
Today, I'm sharing a little something I made for my T.A. He was my student for 2 years, and now he's graduated to being my TA! *Ü* He is very athletic & an awesome kiddo all around. Not to mention, he's a great T.A! Since we're hitting one month into the new school year, I wanted to make a little something to show him how much I appreciate all he does to help me in the classroom.
Here it is:
 This little Converse high-top shoe is all made out of paper. It's another great svg project from my fave svgcuts.com. It is from the Back to the Books kit. I used the MFT all-star stamp set to add the details.

Here's an aerial shot:
 I will fill it with some of his favorite treats *Ü*

I even added some embossing detail to the sole:
 Hope he likes it! This would also be cute for a PE teacher, or a coach, don't ya think?

Thanks so much for peeking today!
Tootles!

Monday, September 2, 2013

Thank You, Teacher

Hi ya friends,
Long time no see!  I'm back today to share a few things I had a chance to work on recently.
It's back to school time for lots of peeps, including my little one. I think there's something right about starting school after Labor Day, maybe I'm a creature of habit. Anyhoo, I thought this week I would share some school-inspired projects to get you in the school spirit!

Today, I have a teacher card to share:
 I used one of my fave teacher images: MFT's A la Modes~ An Apple for Teacher. I decided I would use some honeycomb paper to pop-up the apple & make it fun *Ü*

I think any apple teacher card should be accompanied by an apple treat box you can fill with loads of goodies!
 The apple box is an svg file from my FAVE svg site~ svgcuts.com. It's from Miss Baker's Classroom.
I was going to put some Caramel Apple Sugar Babies I bought, but I don't think the teacher wants only three Sugar Babies :( ooops! They were pretty yummy though!

Here's a peek of the simple innies:
 I used this week's MFT sketch:

I have one more card I made last week, but didn't get a chance to post it:
 I used MFT's At the Movies stamp & DIenamics set. I think I've used this one more than any other MFT set I own (and I have lots!) I luv, luv, luv it!

Here's a peek of the innies:
 It's going to a friend who loves going to the movies. I think she'll like it *Ü*

and here's last week's sketch:
Thanks so much for peeking today!
I'll be back with more school goodies...
Tootles!

Saturday, August 10, 2013

A peek inside... & some treats!

Hi friends,
So, the new school year is underway for me. The first week went well & I'm very excited about the new school year. 
Today, I'd thought I'd give you a peek inside my classroom & how I set up for the beginning of the year.

As you walk in, this is what you see towards the right. My seating arrangement is in rows that face one side of the room towards the other. This way, it allows for space in the middle of the room so I can get to the back of the room quickly & easily. It also makes it easy for students to work with a partner or form groups. I cut out the "Bienvevidos" (Welcome) letters with my Cricut.


This shot gives you a peek at the far left side of the room. At the far left is my desk area. I have two long banners of papel picado that hang across the room.

This is a shot of the far right side of the room. 

This is a shot from the back of the room looking towards the front. The little table in the middle is where I have my projector & laptop. 
 You may see the influence of my elementary teaching days in my classroom. Most HS classrooms are pretty plain, but I like my class to look colorful, inviting & fun!

And here's my desk. I had to take a pic of this because it won't look this for long! *Ü*
 Did you notice some of the boxes I created in the past for Teacher Gifts? I still have mine & use them everyday! And if you make one for your fave teacher she'll be enjoying them for a long time to come, just as I have *Ü* Check out the "Teacher Appreciation" label on the sidebar of my blog for tutorials & ideas.

Speaking of teacher gifts...
Here are the gifts I made for the teachers in my department.
I found these cute little buckets that had a chalkboard label on them in the dollar bin at Target. I wrote their names on it with a Sharpie paint pen. I added stitch marks around it then added a little apple sticker & ribbon strips to the handles. Cute & so simple *Ü*

Then I filled them with some treats.

Here's a closer peek at it.

The first day of school is such a busy day, we may not even have a chance to eat lunch until after school. So having a few treats to munch on during the day, helps hold us over until we can sit down to eat!

Thanks so much for peeking!
 ¡Adios!

Wednesday, July 31, 2013

Tags of 2013- July

Hi friends,
Well, the good life is over. It's time to trade in the bikini for the books- back to school time for me!
Yes, already! I can't complain because I had a great summer & I feel like the batteries are recharged.

I'm just in the nick of time for July's tag.
Here's T!m's:

 Here's mine:
To be honest, I wasn't moved by this month's technique (which is why I waited so long). But I have done all of the other tags this year so I felt like I was letting myself down by not completing it. I did the technique of brayering in the background & the distress crackle paint with stain technique. I really don't know why, at this point it time, I doubt the creative genius that is Tim. Seriously, he has never disappointed and he didn't disappoint with this month's technique. If only I got a good pic of the leaves! They look absolutely amazing!!! I only wish more of the reds & greens would have shown through :(  Sorry, for doubting you once again Tim! Bad Karli :(

Well, it will be a bit quiet around the blog home until I'm settled in to my new school year. I am teaching my favorite class again- Spanish 1 *Ü* yay! and my not so favorite class- AP prep :( ah well, I hope this is a great year nonetheless. I do look forward to a new batch of nearly 200 kiddos!

Thanks for stopping by today!
Until the next time crafty friends!
Blog Widget by LinkWithin